July 01, 2023

"Dream" Wooden Panel - Lindy's Gang June 2023 Challenge

 Hi everyone,

I have my entry for the Lindy's Gang June, 2023 Challenge. I used some Magicals with white gesso to create the colors I needed for the challenge: Azure Sea Asters, C'est la vie Cerise, Pocketwatch Pewter, Prima Donna Purple, and Sandra De Sepia.


Thanks for checking out my project. See you soon!

~Jessica Fischer~


June 28, 2023

"Mother Mary" Mixed Media Layout for the 13arts June Challenge!

Hi friends,

I am sharing a layout with you today titled "Mother Mary" and I created it for the 13arts June, 2023 Challenge.


I was inspired by the colors, and the strawberries reminded me of "fruit"! Anybody ever create a piece and think they want to add more to it, but something deep in them says, "No. Just stop now."? That's what happened to me for this piece!

On a personal note, I decided to go back toward my faith, since medications and therapy for six years have not helped me. Who knows. All I know is science alone is not working, and it would be insane for me to continue on a path that just is not working. I made the decision to add faith to my medications. 

Here is the mood board for June:


I used the 13arts "In Love" Collection for the background paper, layered pieces of scripture on the background, softened it with a diluted coating of white gesso, and added some modeling paste with some 13arts stencils. The butterflies on the page are from the 13arts Transparent Printed Foil "Butterfly Garden".


The red flowers behind the cross and on the left side of the page are ephemera from the "Queen of the Night" Collection.


For Mary, I used the beautiful illustration from the "In Love" Collection. The mists I used are 13arts Ayeeda Mists - Pastel Cobalt and Chalk White mixed together.


The three flowers you see with the gold beads in the center are Prima Marketing's "Georgia Blues" flowers.


All of the chipboard pieces on my page are from 2Crafty Chipboard. The blue chipboard pieces are the 2Crafty Chipboard Pointed Doily Frames, and I embossed them with Blue Fern Studios embossing powder.

The large piece of chipboard on the left side of the page was embossed with Ranger Super Fine Detail Embossing Powder in White.


I will leave you with this:

Hail, Mary, full of grace,
the Lord is with thee.
Blessed art thou amongst women
and blessed is the fruit of thy womb, Jesus.
Holy Mary, Mother of God,
pray for us sinners,
now and at the hour of our death. 
Amen.

God bless you all and I hope to see you back here soon!

~Jessica Fischer~

June 18, 2023

Abstract Nautical Theme Canvas - Grungy - Acrylic Mixed Media

Hello my friends,

I decided to experiment with acrylics on a canvas. This is sort of an abstract nautical theme to match some of the decor in my parents' home. It is a bit dark and grungy to go with the theme. It was fun to experiment with the many layers. Here are the pictures (I apologize for the lighting that isn't very good):


I seem to enjoy working with the other paints that I usually use, but this was still an interesting experience.

God bless you all, and thank you for taking a glance!

~Jessica Fischer~


April 02, 2023

"Glitz and Grunge" Canvas Board - Rusty Gears and Sparkle!

Hello sweeties!

I have something different to share today. I am going to call it "Glitz and Grunge". It is actually on a mixed media paper that I glued to a heavy watercolor paper, so the project is 12" x 12". Once I started adding so many mixed media layers, I had to glue it to some very heavy watercolor paper.  I would suggest to create something like this on a canvas board instead.

I love a teal and coral color combination!

You can find a more full list of products at the end of my blog entry.


Here is a nice closeup of the Tim Holtz sprockets that I painted with black gesso first, then the DecoArt Rust Effects. I randomly decided to add a piece of white string under the gears. I still don't know why! Does anyone else out there do things like that? Haha


So this is the bottom right side of the make-shift "canvas board", and if you look very, very hard, you can see that I have collage pieces under all of the layers. If you notice, vertically I have a Blue Fern Studios' ephemera piece that says "Life is Messy". If I could go back and do this project again, I would make sure that many of the words I used from various ephemera would have been noticeable.


The layers of gesso, modeling paste, acrylic paints, Lindy's Gang paints, glitter, and prills, the paper became very heavy. For this project, this is the first time I tried to use a glazing medium.


Crackle paste, cheesecloth, glass bead gel... If you look close, you can even see some Little Birdie Craft's coral flowers under the glass bead gel and prills.

Here is a more complete list of products I used:

13arts
Stencil - Demask
Stencil - Always the Music
Ephemera

Lindy's Gang
Spray - Sandra Dee Sepia
Spray - Whale Watch Blue
Magicals - Sea Grass Green
Magicals - Tibetan Poppy Teal

Liquitex
Black Gesso
Basics Acrylic Gesso 
Matte Gel

Golden
Glass Bead Gel
Crackle Paste
Modeling Paste

Tim Holtz
idea-ology - Sprocket Gears
Distress Ink Pad - Vintage Photo
Texture Paste - Transparent Gloss
Stencil - Crackle

Little Birdie Crafts
Flowers

DecoArt
Stencil - Crackle
Designer Finishes Rusted Metal Kit
Glazing Medium

USArtQuest
Prills - Coral

Blue Fern Studios
Glitter - Black Ice
Glitter - Blue Ice
Glitter - Russett
Ephemera

Well, I hope I inspired someone to try something new. I have a lot to learn about how to use a glazing medium, but I look forward to the challenge!

~Jessica Fischer~

March 08, 2023

"Amazing" Mixed Media Layout - Baby's Colorful Birthday!

Hello my friends,

Today I have a colorful layout for a beautiful little girl's first birthday.


I used so many different mists, glass beads, and glitters that I cannot list every single one. The background paper is Canva paper which is nice and thick. It is a bit hard to see, but behind the oval frame and on the right side of the page, I fussy cut some flowers from an old 13arts collection.


I used a 13arts stencil with modeling paste. Before I put the colors on the paper, I used Ranger Translucent Gloss Gel and a Tim Holtz Lines stencil, then while wet, I sprinkled on many different glass bead colors and glitters.


The mists used on the page are from 13arts and Lindy's Stamp Gang. The chipboard piece with the colored gems on it and the title chipboard are both from 2Crafty Chipboard. My chipboard was embossed with Fine White Ranger embossing powder first. On the frame and the title piece, I used a Blue Fern Studio's stamp and blue embossing powder. 


The white and blue flowers are from Prima Marketing. The small pink flowers are from Wild Orchid Crafts, and I sprayed them with Lindy's Stamp Gang Autumn Maple Crimson. The white roses with pink tips are from Wild Orchid Crafts also, and I added Blue Fern Studios glass beads to the tips with Matte Gel.


I hope I was able to inspire you today with a bright, colorful, rainbow, and glitter layout on a white background! Until next time my friends!

~Jessica Fischer~

June 28, 2022

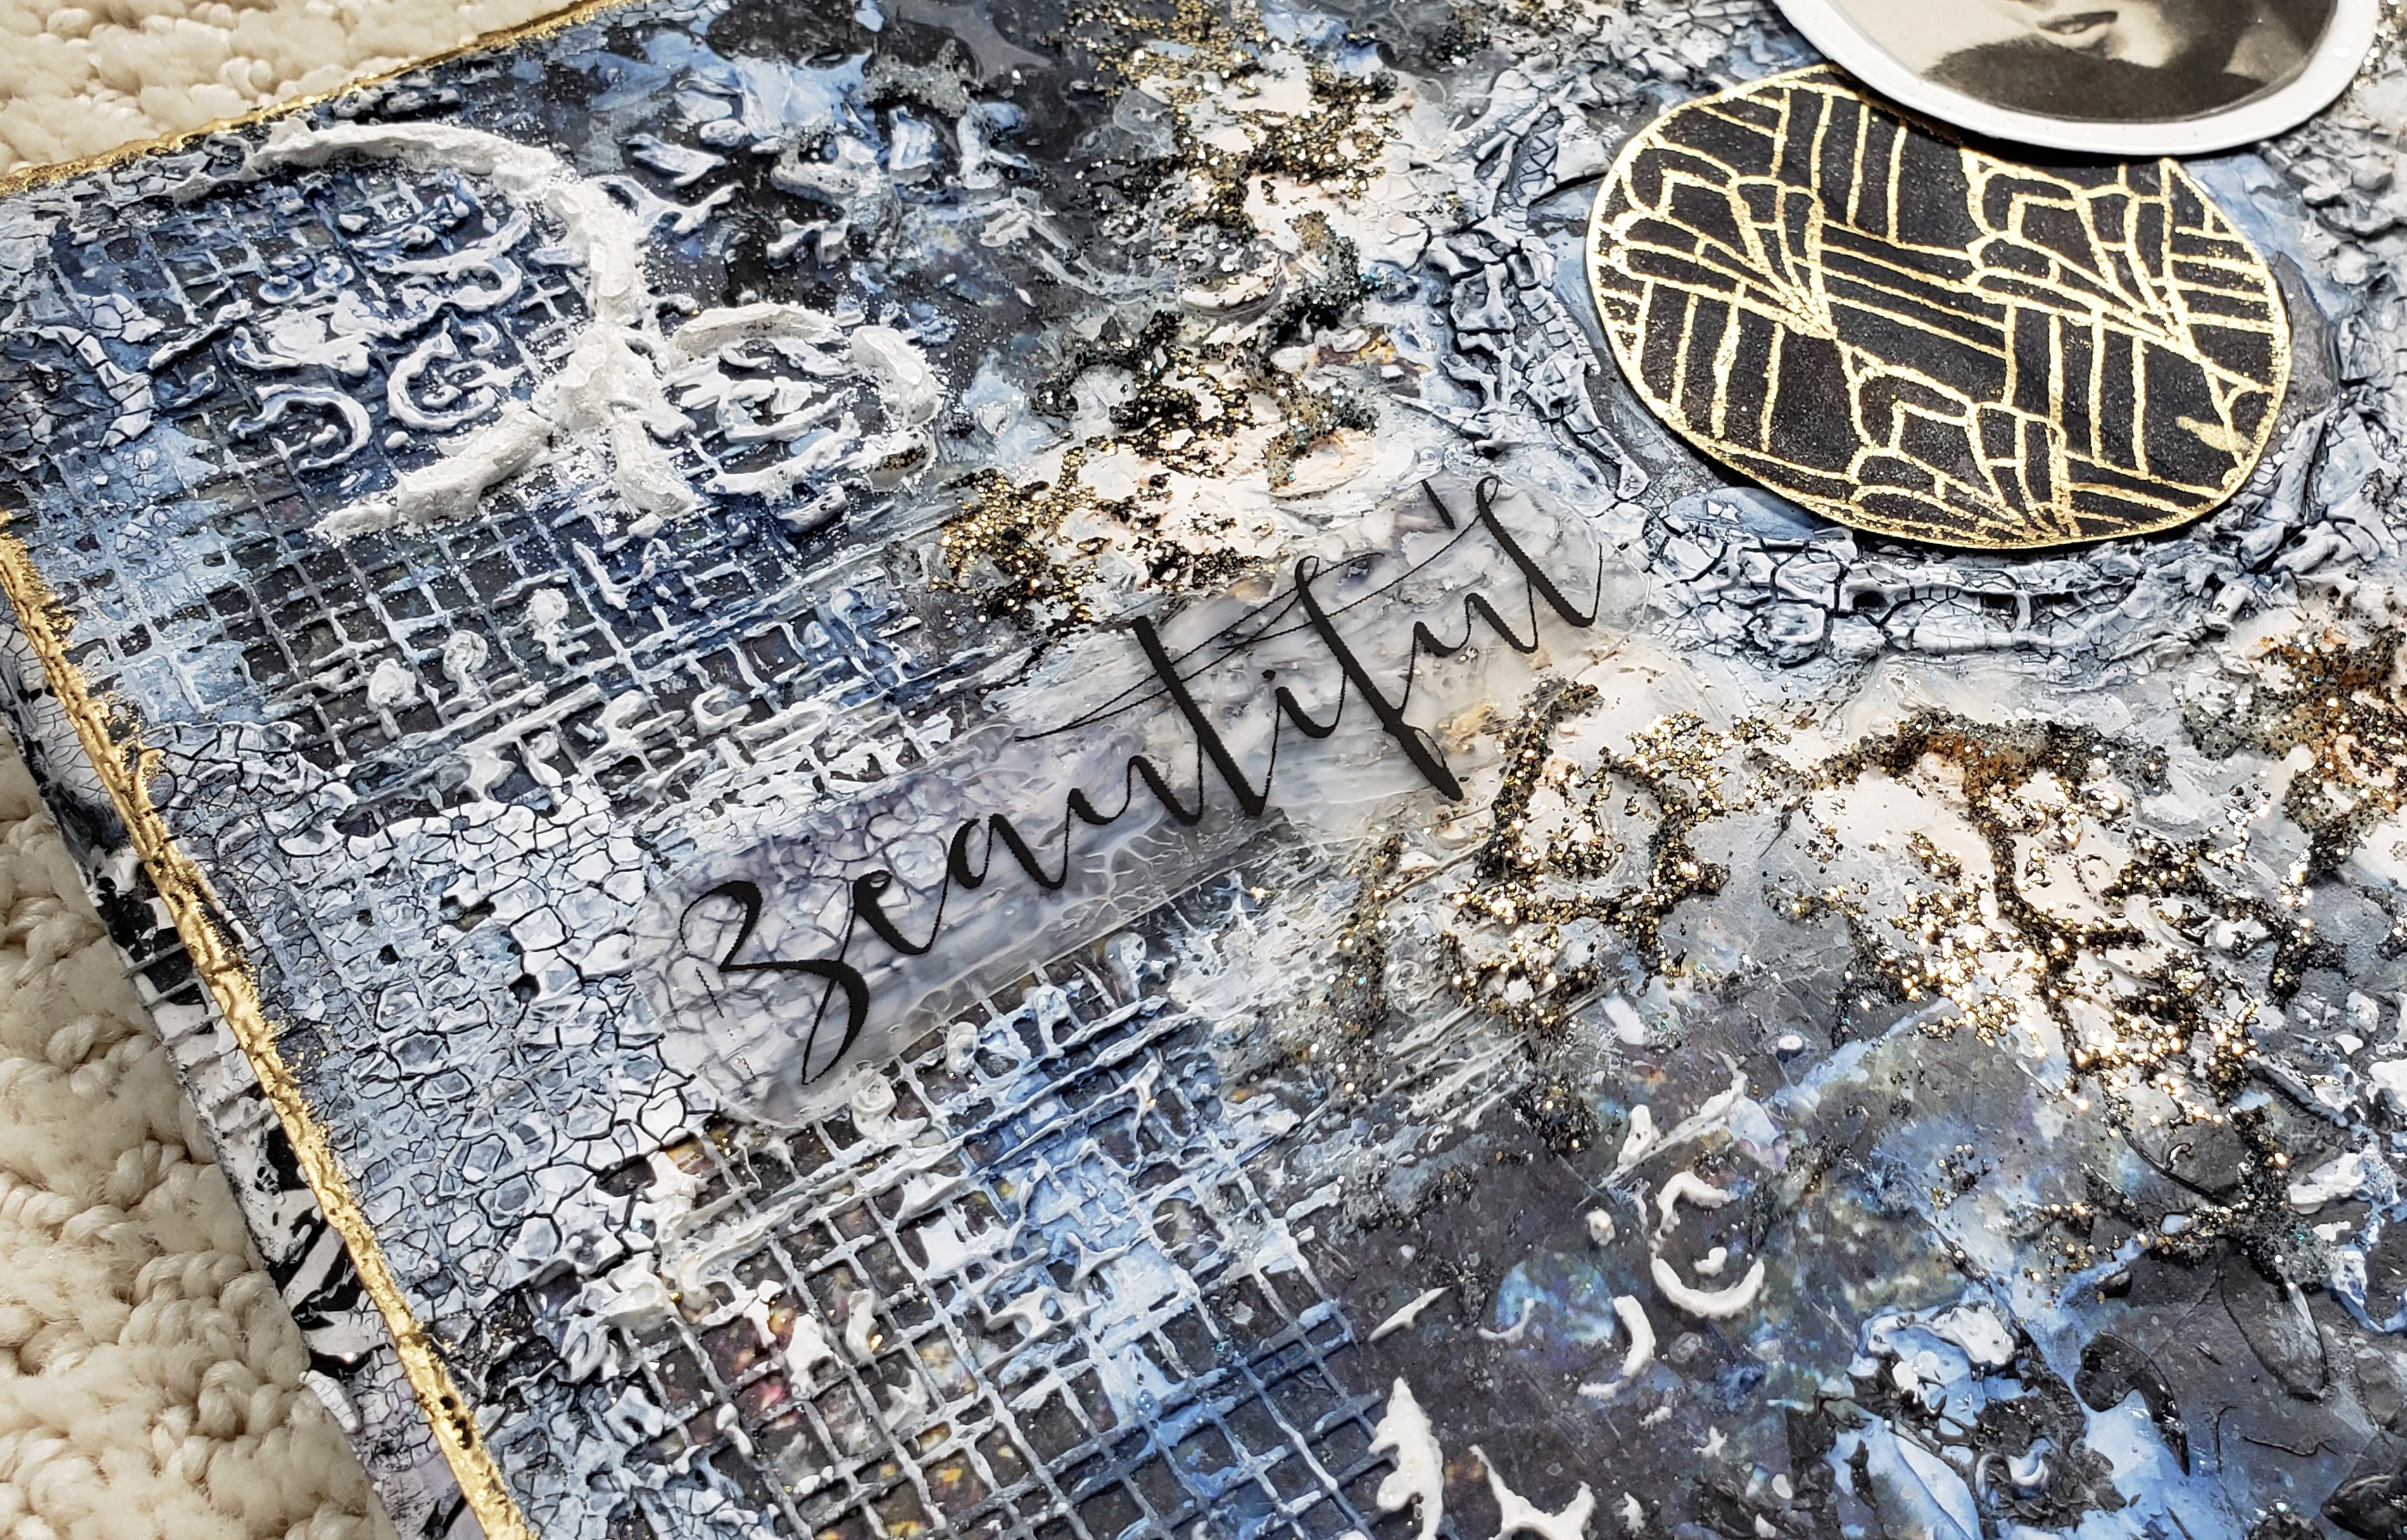
Video Tutorial for Art Journal Spread "Beautiful and Gorgeous"

Hello you precious, pretty people. 

The FOCUS of today's video tutorial for an art journal spread is that there are creative ways to fix what you might consider... well... ugly. It is mostly about a THOUGHT PROCESS - not as much as a "how to".

After I added a peach color to my background, I actually showed my mom how bad it looked. She told me the colors reminded her of some art deco colors from a house remodeling show. Then she suggested adding a vintage picture of Loretta Young that my grandfather received while serving in the war along with an "art deco" pattern somewhere...

So a shout-out to mom! I was able to transform my "ugly" idea into something beautiful! The journal spread might have been easier to complete on a canvas board, but that's okay. It worked.

You can see the video tutorial and a complete list of products I used at the bottom of my blog entry.


Loretta Young was both beautiful and gorgeous so the title from the 13arts foil "A Letter to You" was appropriate.


Here is the left side of the spread...


And the right side of the spread...


And now the close-up of the center!


Products Used:

13arts
Ayeeda Mist - "Pastel Cobalt"
Foil - "A Letter to You"
Stencil - "Always the Music"
Stencil - "Damask"

Art Anthology
Stencil - "Cracked"

Blue Fern Studios
Glitter - "Black Ice"
Embossing Powder - "Black and Gold"

The Crafter's Workshop
Stencil - "Specimens"

Lindy's Gang
Starburst Spray - "Midnight Rendervous Raven"

Little Birdie Crafts
Stencil - "Threadbare Net"

Prima
Comfort Craft - Distressing Tool
Finnabair Stamp - "Clear Crackle"
Finnabair Art Basics - Modeling Paste
Finnabair Art Basics - "Heavy Gesso"

Ranger
Distress Texture Paste - "Crackle"
Embossing Powder - Super Fine Detail - "White"
Distress Spray Stain - "Dried Marigold"

Liquitex
Gesso - "Black"
Gesso - "White"
Matte Gel
Fluid Matte Gel

Golden
Glass Bead Gel

Versamark
Watermark Stamp Pad

Colorbox
Pigment Ink Pad - "Black"

Finally, here is the video tutorial proving that something "ugly" can turn out great!


Thanks for stopping by! Until next time...

~Jessica Fischer~

June 22, 2022

"Forever" Mixed Media Layout & Video Tutorial

Hi my darlings! I have a video tutorial to share with you today for my new layout titled "Forever" in memory of my cat Crimson. Most of the tutorial focuses on creating very detailed embellishments for your layouts. You can go directly to my video tutorial on YouTube or you can watch it at the end of my blog post.


For a complete list of products I used, you can check the end of my blog post. My paper is from the 13arts Until Dawn Collection "Days and Nights". I used various 13arts mists and stencils also.


I used some 2Crafty Chipboard also. The title is from the Mini Word Set 2. The three pretty rose embellishments are Wild Orchid Crafts' Ivory Rose Cabochon Pearl Effect Embellishments. The frame behind the picture and the three hearts are from Blue Fern Studios.


I used "Army Dust" Glitter from Blue Fern Studios over glass bead gel with the 13arts "Falling Dots" Stencil.


The two small black and one small red flower are from Wild Orchid Crafts that I painted. The black ones are covered in black gesso and spritzed with Lindy's Gang Starburst Spray "Creme Brulee Cream". The red flowers on my page are painted with a mix of 13arts Ayeeda Mist "Chalk Burnt Sienna" and Distress Spray Stain "Black Soot".


The circle chipboard pieces at the top and bottom of the layout are from the 2Crafty Chipboard Frame Viney Circles, and the flowers under them are Prima Oia Flower Embellishments.

Here is a more complete list of products I used:

13arts
Paper - Until Dawn Collection - "Days and Nights"
Ayeeda Mist - "Chalk Burnt Sienna"
Ayeeda Mist - "Pastel Lavender"
Stencil - "Swirls"
Stencil - "Falling Dots"
Fussy Cut Leaves - Aqua Flora Collection - "Colors of Summer"

2Crafty Chipboard

Blue Fern Studios
Stamp - Tattered Newspaper
Glitter - "Army Dust"
Embossing Powder - "Ivory"
Embossing Powder - "Green Ivory"
Stamp - "Crackle"
Chipboard - Frame
Chipboard Stickers - "In the Mood" Collection

Ranger
Distressed Spray Stain - "Black Soot"
Distress Paint - "Black Soot"
Archival Ink Pad - "Jet Black"
Super Fine Detail Embossing Powder - "White"
Glossy Accents
Melt Art - Ultra Thick Embossing Powder - "Clear"

Prima
Finnabair Art Basics - Modeling Paste
Finnabair Art Basics - Heavy Gesso
Flowers - "Oia" Flower Embellishments

Lindy's Gang
Starburst Spray - "Creme Brulee Cream"

Shimmerz
Spritz - "Taupe of the World"

Wild Orchard Crafts
Small Flowers - Pink
Cabochon Embellishments - Ivory Rose Pearl Effect

And here is the video tutorial to show you my process!


I hope you enjoyed the layout! Remember to show tons of love to all of your furry friends every day. They are true blessings.

~Jessica Fischer~

June 21, 2022

"Treasure" Mixed Media Layout - Guest Designer for White with 1 Challenge Blog!

Hello dear friends. Today I am sharing my newest layout titled "Treasure" as guest designer for the White with 1 Challenge Blog for June, 2022! This month's color is orange...


A big "thank you" for the folks over at the White with 1 Challenge Blog for the invitation! Here is the mood board for this June:


Since I love the ocean, I chose a picture of the sunset on the beach.


Please scroll to the end of my blog entry to see a more complete list of products I used.

To begin, I used 98 lb. mixed media paper covered in clear gesso. The orange in the background and the Wild Orchard Crafts Roses were painted with "Dried Marigold" Distress Spray Stain and mixed with the orange from Prima's Watercolor Confections "The Classics".


I used three pieces of 2Crafty Chipboard for my layout. The title "Treasure" comes from the Friendship Mini Word Pack; the small, intricate frame under and above the picture is Frames Tiny Kathleen's; and the larger flourishes to the left and right of the picture is Formal Flourish 3. All pieces were first painted with white gesso. Then I embossed the title with white embossing powder. The flourishes got some crackle texture paste applied randomly.


I added some Mini Prills on the seashells with matte gel medium and some fine glitter under and around the glass stones.


In the picture above, you can really see the fun textures.


The white flowers are from Little Birdie Crafts' "White" Pearl Petites.


In the picture above, you can see the 13arts stencil "Her Style" that I used with modeling paste, then embossed with white embossing powder.

I hope you enjoyed this layout!

Products Used:

2Crafty Chipboard

13arts
Stencil - "Her Style"

Ranger
Distress Spray Stain - "Dried Marigold"
Distress Texture Paste - "Crackle"
Embossing Powder - Super Fine - "White"

Prima
Art Basics - Modeling Paste
Art Basics - Heavy Gesso
Confections Watercolor - "The Classics"

Little Birdie Crafts
Flowers - Pearl Petites - "White"

Wild Orchard Crafts
Roses - "Coral"

USArtQuest
Mini Prills - "Minnie Pearls"

Thanks for stopping by my blog, and I hope to see you next time!

~Jessica Fischer~

June 10, 2022

"Happy" Mixed Media Layout - Video Tutorial - Lindy's Gang - June, 2022 Challenge

Hi my friends. I have a new layout and video tutorial to share with you titled "Happy" for the Lindy's Gang June, 2022 Challenge. You can visit the Lindy's Store here.

As always, a lot of the video tutorial is in fast forward, and some monotonous parts have been shortened. You can find the video below or click on this link to watch it on Youtube. The list of products I used can be found below.


Here is the Lindy's Challenge Board with Flowers being the ingredient this month:


Here are some closeups and angles:


Products Used:

Lindy's Gang
Magical - "Sea Grass Green"
Color Shot - "My Mojito Green"
Spray - Flat Fabio - "Sandra Dee Sepia"
Spray - Starburst - "Autumn Maple Crimson"
Spray - Starburst - "Bodacious Blush"
Spray - Starburst - "Creme Brulee Cream"

2Crafty Chipboard
Friendship Mini Word Pack
Amelia Flower Stems - Small

13arts
Stencil - "Damask"
Elements - "Rose Fields"

Blue Fern Studios
Paper - Tattered Walls Collection - "The Carolina Room"
Stamp - Text

Prima
Finnabair Art Basics - White Heavy Gesso
Finnabair Art Basics - Modeling Paste

Ranger
Distress Ink Pad - "Antique Linen"
Distress Ink Pad - "Vintage Photo"
Archival Ink - "Jet Black"
Distress Texture Paste - "Crackle"

Wild Orchid Crafts
Roses
Mini Roses

Art Anthology
Stencil - Cracked

PearlEx
"Antique Copper"

49 and Market
Flower Blossom Blends

Now for the video tutorial! I hope you like it.


Thanks for stopping by!

~Jessica Fischer~